 A second career for all those ribbons and rosettes.
A second life for all those ribbons and rosettes!
The following article I have taken from “Best In Show Daily publication” and freely translated. It was originally written by Sheila Blanning.
From this...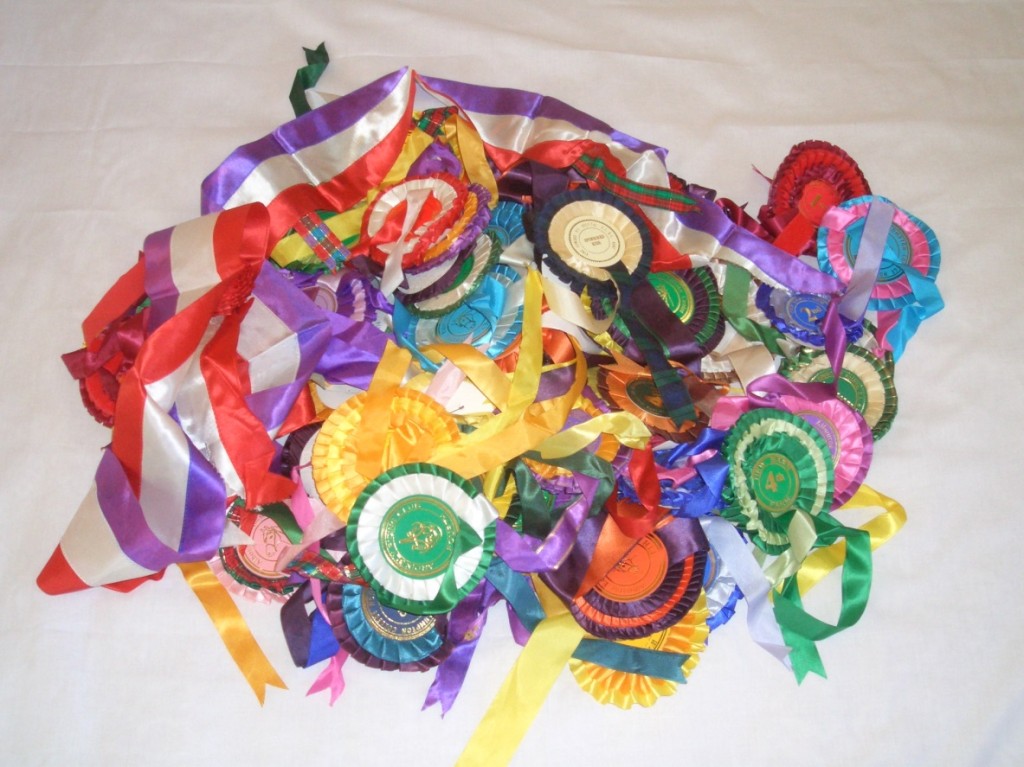
to this…
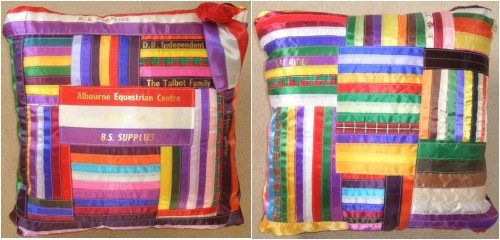
… The front and back of a cushion.
If you’ve ever wondered what to do with all those rosettes that your favourite hound won for you, and that are now gathering dust in your tackroom, or shoved away in a box under the bed because you haven’t got enough wallspace but can’t bear to throw them away, I hope that this article may provide you with the inspiration and technique to turn them into something useful and decorative. You don’t need to be a skilled seamstress, all you require is a sewing machine and a few spare hours.
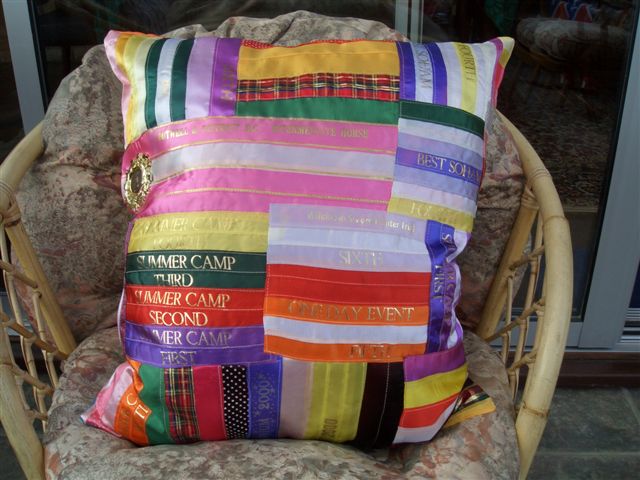
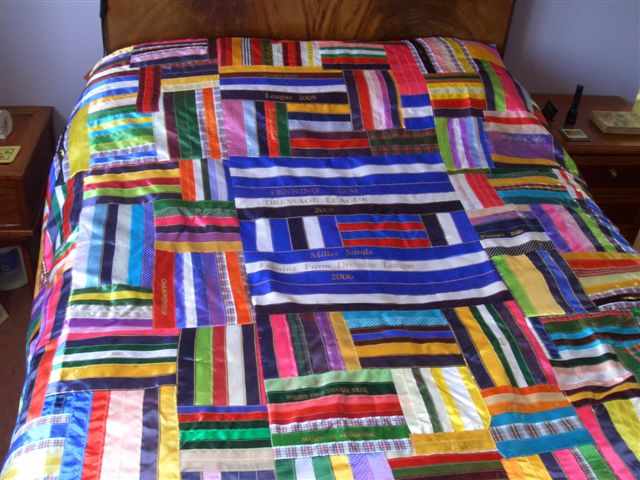
A pillow and……………………………………………………….. a bedspread.
It would be too difficult for me to explain how I made these creations without taking photographs of every step of the process, so I am most grateful to Carley who entrusted me with her treasured rosettes and a championship sash, which I am going to turn into a cushion cover.
On the basis of the photos I will show you how to proceed. All that you need for this project is a sewing machine with a good quality needle suitable for sewing silk, cotton thread, and some plain cotton material to sew the ribbons onto and to provide the cover for the cushion. If you have an old bedsheet that you don’t want, that will do fine. I used a white flat sheet that I no longer needed. The ribbons will be overstitched so you need to choose a fairly neutral colour for the cotton thread, I used a pale gold colour. This project uses a surprising amount of thread so it’s a good idea to have plenty of the same colour to hand, I used two 100m reels.
 First job is to sort through all your rosettes, count them up and have a think about whether there are some more precious than others that you would like to have pride of place on your cushion. Carley gave me fifty-four rosettes with double ribbons, ten with triple ribbons, five lovely ones with great big long ribbons, and a championship sash. At this stage I don’t know how big the cushion is going to be, but I am going to try and make a special feature of the sash and biggest ribbons. I think that in America you use the word “ribbon” where we Brits say “rosette”, so for the purposes of clarity in this article, when I talk about a “rosette” I mean the entire circle with tail ribbons attached, and when I say “ribbon” I mean the strips that I’m going to cut off the top circle and use to make the cushion.
Having counted them and had a nice nostalgic wallow remembering the happy times when you won them, sort them into rough piles according to the length and width of the ribbons. Most of them will be just under an inch wide, but they will probably vary in length. For each block of ribbons that you’re going to sew, you need 12-14 ribbons if they’re about an inch wide. Some rosettes will have two and some will have three ribbons. Once they’re sorted, pick out enough of approximately the same ribbon width and length to total up to a dozen or so, making sure you have a good choice of colours.

Then harden your heart, get out the scissors and cut the ribbons off the top circle, as near to the cardboard disc as possible, especially those with the shorter ribbons.
Off to the ironing board next, as the ribbons are probably very crumpled after being shoved in a drawer, and once you’ve ironed them with a fairly cool iron, you can arrange them into a block on your cotton sheet, keeping the shiny side up. I like to keep each pair or trio of ribbons together, but if you want to coordinate your colours differently, any which way will do. Overlapping them by at least one-eighth of an inch, keep the straight edge, where you cut them off the top circle, lined up to the left. The ribbons won’t all be exactly the same length, but you can trim them off on the right hand side when you’ve arranged them to your satisfaction. I had more than I needed for this particular block, so I put some aside for the next one.

Now that you’re happy with your block, cut the cotton sheet so that you have a border of about an inch all round. Take the ribbons off the sheet and put them carefully, in order of your design, on your table or a tray so that they don’t get muddled before you sew them onto the sheet. They do need to be sewn onto the sheet, and not just sewn together in blocks, because the material that rosettes are made from isn’t very strong and frays easily.
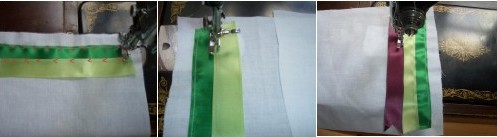
This is the time when my antique Singer sewing machine gets busy. If you have a nice electric one, you’ll whizz through the next bit. Take the first ribbon, that’s the one on the top, the green one in my picture. Sew it onto the cotton sheet on three sides, starting at the bottom left hand corner, go up and along the top edge, and part of the way down the right hand side (see the arrows on the next photo). Then pick up your next ribbon, in my photo the lighter green one, hold it overlapping the top one, continue sewing downwards until the two are joined, then turn the corner and sew the top of the second ribbon (the lighter green one) over the bottom of the top ribbon. When you get to the edge, sew downwards, get your third ribbon, and so on. You will go back and forth until you get to the end of the last ribbon, sew along the bottom edge, and tie off. You shouldn’t have needed to stop and tie off your thread at any stage along the way from top to bottom.
Now that you’ve sewn all the ribbons onto the sheet, you can put it aside and go onto the next block in exactly the same way.

I’ve sewn seven blocks of ribbons together, so it’s time to take stock of how much I’ve done, how many ribbons I’ve got left, and make sure I have enough blocks of the right size to achieve what I’ve got in mind. Carley has given me a lovely sash and five rosettes with very long and lavish tails, and I want to try and make a border of these, and a centrepiece of the sash, on the top side of the cushion, with small blocks of ribbons in between.
First of all I need to tidy up the edges so that I can start planning which blocks go where. On the top and bottom edges, where you have the neat edge of the ribbons, turn the overlapping backing material to the back and iron it flat so that it doesn’t show. Don’t worry about the side edges which look rather messy, they will be hidden one way or another.
 Iron down the Edges (R) Finished Edges")
Now have a play around and arrange your blocks on the cotton sheet into a square or rectangle, depending on what shape of cushion you want. Overlap a block with a straight edge onto a messy edge, you’ll be oversewing the blocks and the messy edges will disappear.
 Here I’ve got mine roughly where I want them and can see that I have sewn enough blocks to complete the back of the cushion cover. Now that I know the size I am working to I can get to work on the front cover. I’m not going to sew the blocks onto the sheet until I’m certain that I have enough ribbons to complete the front cover, just in case I need to make some last minute changes.
Once you’ve got the blocks for the front cover completed and laid out in a square or rectangle the same size as the back cover, all you have to do is sew along all the overlapping edges of the blocks so that they are held firmly in place on the sheet. I find it easier to do this a little bit at a time, so to start with I’ve taken all the blocks off the sheet except for the top four, and I’ve pinned along the route that my sewing machine is going to take, being careful not to sew along any edges that are going to end up on the top of the next lot of blocks to be sewn on. Then I’ll add in a few more blocks and keep going in this way until all the blocks are sewn on.
When all the blocks are sewn on, you can complete the other half of the cushion cover in exactly the same way. Here are the front and back of mine, ready to be sewn together.

Once I’ve machined round three sides of the cushion, I can at last take a final accurate measurement of the finished cushion cover and purchase a filler of the correct size. Then put that in, sew up the final side by hand, and job done!